r panel system with this straightforward wiring diagram and step-by-step guide. Wiring a 12V solar panel typically involves connecting the positive and negative terminals of the panel to the corresponding terminals of a solar charge controller, a device that regulat s. . Photovoltaic panels vertical and horizont t can come as a surprise to many that solar panels can be installed ve tically. Vertical solar panel installation may be a valid optio for your home. Most homes achieve better results with a horizontal orientation, especially when aiming to capture the most sunlight on the panels. You can even install them as a free-standing. . In residential and commercial photovoltaic projects, the orientation of PV modules is far more than a simple installation choice — it affects system efficiency, drainage performance, aesthetics, and maintenance requirements. As photovoltaic systems become more diverse and decentralised, rooftops. . This manual elaborates on installation and safety use information for PV power gener-ating modules (hereinafter referred to as module) of LONGi Solar Technology Co. (hereinafter referred to as LONGi).
[PDF Version]
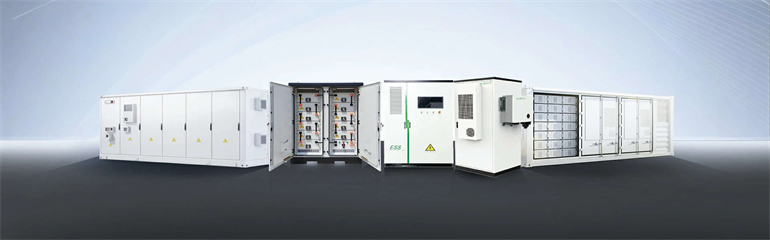
This video walks through the real installation process — from unpacking to setup — designed specifically for urban balconies. If there is a break in your roof,or you have room for one more solar panel,then your solar ontractor can install the solar panel to fit the sp m well suited to be installed vertically on most roofs. f course,not every home--or roof--is. . fessional services. The Skyworth Group was founded in 1988. With more than 30 years of manufactur ng experience,we can provide you with scientific ts that work together to convert sunlight into electricity. The main components of a PV system include: Solar panels:These are the primar component of. . Beijing Skyworth Clean Energy Technology Co. (Overseas Business) Room 608,Building #6, Skyworth Innovation Valley, TangTou Road No. (Domestic Business) . The mechanical and electrical installation of PV systems should be performed in accordance with all applicable codes, including electrical codes; building codes and electric utility interconnect requirements.
[PDF Version]
straightforward wiring diagram and step-by-step guide. Wiring a 12V solar panel typically involves connecting the e installation and maintenance of solar panel systems. These diagrams provide a vi ual representation of how the panels are connec. Summary: Discover professional techniques for welding roof photovoltaic panels, including step-by-step installation methods, industry best practices, and data-backed insights. Learn how proper welding ensures system durability and energy efficiency in solar projects. Instal ation should only be performed by qualified personnel. . Photovoltaic panel rack welding method diagram Photovoltaic panel rack welding method diagram What are the components of a solar stack pedestal system? The system is a non-separately derived system. This guide explores industry best practices, cost-saving strategies, and emerging trends in photovoltaic panel deployment for commercial and residential applications. Mechanical connectors can be mounted to a module or racking frame with lay-in features which accept a copper wi e that bonds and grounds components, said Zwit. case of sale or disposal of the modules. The module is considered to be in. .
[PDF Version]
Before you start, it is important to have a solar panel installation diagram that outlines the layout and connection of the panels. This diagram will serve as a blueprint for your project, helping you plan the placement of each panel and ensure an efficient and effective installation. Find out everything you need to produce these important design elements without encountering any drawbacks Creating the photovoltaic system diagram represents an important phase in. . Reviewed by Max Harris, Quality Assurance Electrician for GreenLancer A solar energy diagram is one of the most important tools in a PV project because it shows how the system is designed to work before the crew starts installing. For solar installers, designers, and engineers, it acts as the. . Before diving into the technical diagrams, understanding these essential facts about residential solar will ensure optimal placement and configuration.
[PDF Version]
Learn how to install solar panels with a complete step-by-step diagram. . When you install your Solar Power system, try to position your photovoltaic panels directly under the noontime sun for maximum efficiency from your photovoltaic unit. Before Installation, take care of any obstructions to sunlight. Remove all unnecessary obstructions and items such as branches that. . Please read this manual carefully before installing the system and carry out the installation procedures correctly. Be sure to follow OSHA guidelines. If there are any questions, please contact FS GREEN ENERGIES PRIVATE LIMITED Sales department for clarification. The module is considered to be in. . A proper installation diagram serves as your blueprint, detailing exact panel positions, wiring routes, and mounting specifications that accommodate your roof's unique characteristics.
[PDF Version]
For instance, a standard 300-watt Skyworth solar panel might cost anywhere from $750 to $1,050, depending on the model and technological advancements utilized in its production. . Save more every month with Skyworth home solar Seamless rooftop solar installation, hassle-free Reduce grid reliance with optimized self-use Track solar performance anytime, anywhere Skyworth delivers high-efficiency solar panels, robust mounting systems, and trusted PV inverters—backed by local. . The price per watt can fluctuate generally from $2. Tax credits or local incentives may reduce overall costs significantly, 4. Skyworth, a prominent player in the solar energy sector, is recognized for delivering. . Skyworth Group Released Its Results For The First Three Quarters Of 2022: Revenue Of 38. 419 Billion Yuan, A Year-on-year Increase Of 7. 0%, Showing Steady Growth! Ranking Up 19 Places! Skyworth Ranked in Fortune China 500 in 2022 Successfully Connected To The Grid | Skyworth Energy's One-stop. . ty, but installing a system still costs money. On average, consumers can ex E COST OF S nels work best in areas. . This guide breaks down photovoltaic panel slope roof installation prices, explores cost-saving strategies, and shares real-world data to help you make informed decisions. Most homeowners spend between $12,600 and $33,376 to install a complete residential solar system in 2026, with the national average at $19,873 before incentives.
[PDF Version]