In this video, I walk you through the process of mounting solar panels on a standing seam metal roof using S-5 clamps for a clean, no-penetration install. . Getting project materials to the jobsite and onto the roof are often considered unavoidable costs associated with solar mounting. It costs money every time you have to move materials and/or equipment. What if you could greatly reduce the weight and volume of your solar system? Hardgoods - For. . Install a mounting system for solar thermal or solar photovoltaic panels. With its UL 1703 & UL 2703 listing, it is designed with the capabilities to attach to virtually any solar panel frame, using our state of the art GroundBonding Technology, which creates a conductive bond from. .
[PDF Version]
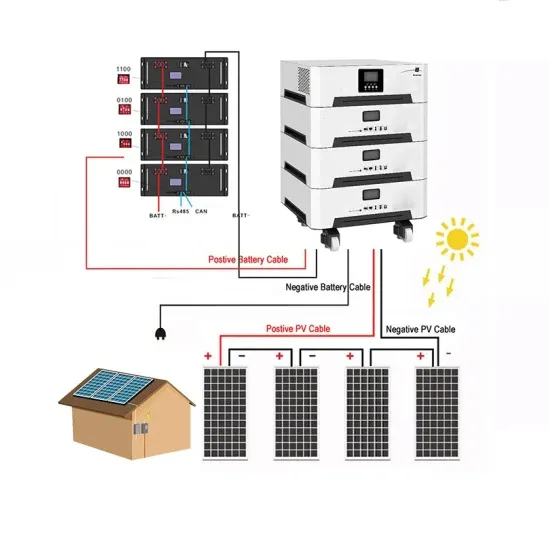
Follow these steps to safely complete your solar panel wiring: Choose Wiring Type: Series, parallel, or hybrid—based on your inverter and shading conditions. Plan Wiring Layout: Measure distances and calculate total cable lengths. . Wiring PV panel wiring is the backbone of a reliable solar power system. Don't worry if you're new to this—this beginner's guide simplifies everything. In this article we will teach you. . In this article, you will explore everything about wiring solar panels, from understanding the basic components to connection types and the tools required, to a step-by-step wiring guide and final testing. Let's get into further details.
[PDF Version]
The accessories of the bracket are divided into: straight connection plates, hinged connection plates, turning connection plates, variable angle connection plates, partitions, pressure plates, and fasteners. According to the connection form, it is divided into welding type and assembly type; according to the installation structure, it is divided into fixed type and day by day type;. . Made of aluminum alloy 6005, anodizing surface treatment. 2" - 2" (30-50 mm) thickness solar frame panel. Two type bolt, M8 x 50mm and M8 x 45mm, Thread pitch 1. In this article, we explore these essential accessories for improving the efficiency of your photovoltaic system. Communication modules are crucial for monitoring and controlling your solar. . CABLOWIND ® is the brand new product which further enriches the range of accessories proposed by Sun Ballast and which combines two distinct functions in a single element: Channel, which allows the correct accommodation of the cables, and additional ballast, to ensure further stability for the wind. . Shop premium solar panel brackets, MC4 connectors, and mounting hardware at Conversions Tech. Professional aluminum Z-brackets, cable clips, Y-branch adapters, and direct-to-deck mounts for rooftop, RV, and off-grid solar installations.
[PDF Version]
Assuming that the thickness of the solar mount system substrate is 2mm, according to the specification GBT13192-2002 hot-dip galvanizing specification, according to the requirements of the national standard, for a 2mm substrate, the local thickness should not be. . Assuming that the thickness of the solar mount system substrate is 2mm, according to the specification GBT13192-2002 hot-dip galvanizing specification, according to the requirements of the national standard, for a 2mm substrate, the local thickness should not be. . As solar projects expand globally, engineers are racing against time to optimize photovoltaic (PV) bracket designs. But here's the kicker – getting the thickness right isn't just about durability; it's a tightrope walk between structural integrity and cost efficiency. Let's break down the numbers. . While most people obsess over panel efficiency (and rightfully so), photovoltaic bracket thickness requirements quietly play MVP in ensuring your system doesn't pull a "Icarus" during heavy winds. Beam specifications: 2m length, 50mm width, 3mm thickness. Tilt angle: Adjusted based on latitude, typically latitude +10°. Compared to the original bracket, the optimized bracket has reduced weight by 8. 459kg, with a weight reduction rate of 14.
[PDF Version]
In this tutorial, I'll show you how to wire solar panels in series and how to wire them in parallel. Once we've got that covered, I'll also explain the difference between these two configurations in Voltage (Volts) and Current (Amps) and provide a real-life example. When you connect the positive terminal of one panel to the negative terminal of. . To achieve such a large power, we need to connect N-number of modules in series and parallel. Smaller systems with just a few panels often work well with a simple series connection, like a string of holiday lights. But larger systems might need a. . Connecting more than one solar panel in series, in parallel or in a mixed-mode is an effective and easy way not only to build a cost-effective solar panel system but also helps us add more solar panels in the future to meet our increasing daily needs for electricity. How to connect your solar. .
[PDF Version]
Learn how to prepare DC cable connections for your PV system in this step-by-step guide. We cover the types of cables you'll need and demonstrate how to crimp them properly for a secure and efficient connection. Whether you're a professional installer or a DIY enthusiast . . This guide will walk you through the essential steps, best practices, and common mistakes to avoid when installing photovoltaic cables. In this article we will teach you. . In this guide, we'll cover it all from simplified wiring diagrams to a thorough coverage of materials and safety procedures so that when it comes time for you to connect your solar panels to your inverter, you're ready without hesitation. Before hooking your solar panels up to an inverter, however. . Before installing the photovoltaic inverter, it is necessary to inspect the electrical equipment to ensure that it meets the installation conditions.
[PDF Version]